Habborator Stacking basics
- Introduction
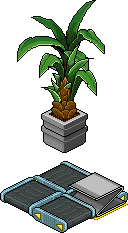
- Material
- Floating items
- Flat stacking
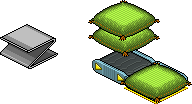
- Roller stacking I
- Roller stacking II
- Casino stacking
- Close stacking
- Issue: rotation
‘Stacking’ is (the art of) mixing and putting furniture items on top of eachother. Some furniture in the hotel is ‘coded’ to have other items on top of it (some tables, mode bars, rollers). Habbos have been creative in finding ways to expand this possibility beyond what it was meant to do, and it is now a ‘cult’ of its own, with master stackers having a huge 1337 factor and all. To be honest, it IS very hard to do this rightfully, so that status might just be well deserved ;).
Stacking, being the exploitation of ‘bugs’, also changes with each new version of the hotel. Weird behavior gets patched, and suddenly known methods stop working. This guide is currently based around v11 of Habbo hotel.
Then again, there’s lots of intermediate releases for bug-fixing, there’s no way of telling what will work in every hotel that has v11 at the moment. You’ll just have to try and see what is working for you. We’re presenting some common methods that are working for us or are reported to work in some hotel on v11, but no guarantees.
Aaaaaanyway, you might feel this is a poor attempt, since you’ve mastered the Habbolaya and stuff. Or, you just feel something is not correct, or should be added. This is the section we feel user input is needed most, so please, just (mail) and/or comment on our msgboard.
It’s not the price that will keep you from being a master in stacking - items needed are cheap.
Key items are (1) the z-shelves and (2) the rollers. Presents and mode corners are used alike the z-shelves but have a different height. The mode bars too, they used to be essential, but can’t be used on rollers, so are not used that much anymore. Other tables and presents can be used to achieve different heights.
In former versions of the hotel - and you might find this in older tutorials - it used to be the case material needed to be IN the room, while items to stack were to be placed from inside your HAND. This is NOT the case anymore !
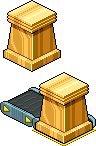
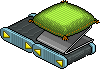
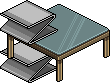
Getting a piece of furniture to float - against the wall - is one of the older methods still working. You’ll only need 2 z-shelves. But there’s more ways these days. The 4 basic methods:
1) Two z-shelves against the wall:
[Or use mode bars/presents.] Put one down, next to a wall. Stack another z-shelf on top of it, then remove the bottom shelf. Re-place it at same spot, it will now go to top position. Take out the bottom shelf again, place elsewhere, and re-place at same spot, will go on top again. Repeat till you’re at desired position.
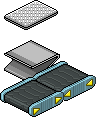
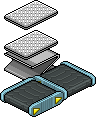
2) Two rollers, two z-shelves:

Above won’t work anywhere in the room, but hey, use two rollers and suddenly it does work. Place two rollers facing eachother, put a z-shelf on, another on top of that. Remove the bottom one, re-place it to get it on top etc.
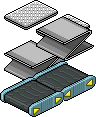
3) Two z-shelves, a present behind:

Like said, you can’t go up with z-shelves in the middle of a room like you can against the wall. There’s another fix. If you place a present behind the spot where you want them going up, it will work.
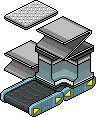
4) [I have a] lot of z-shelves:
You don’t need to do the “put one up, take one out underneath” routine, ofcourse. If you have enough z-shelves, just put as many as you need on top of eachother, place your item and take the shelves away.
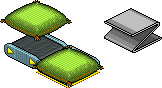
“Flat stacking” is the word used when you’re combining/merging two or more items on the floor. For looks, mostly, but if you combine a chair with something else, you can create something you can sit on, while it doesn’t look that way (this explains all weirdo’s sitting on pumpkins or bunnies… ;).
Only thing you need is two rollers. Put one item on. Then pick up the other item holding the ALT key, place it on one of the rollers, and only release it right after the first item starts moving onto that roller. Don’t remove the roller, but rotate so it slides to the ground.

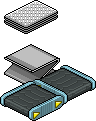
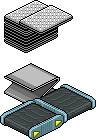
To stack items on top of eachother, you need rollers these days. Here’s stacking 2 lodge corners, just because it’s a popular thing to do. Note that if you want to stack more items, other roller method is more appropiate.
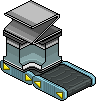
Put down 2 rollers, facing eachother. Put a lodge on, and a z-shelf on top of it.

Now also put one of the lodge corners on top, and remove the mode corner and z-shelf. You’ll have a floating lodge corner. Pick up the other lodge corner while holding the ALT key, and place it on a roller position without releasing it yet.
Only release the corner the (milli)second after the first corner starts moving to the spot you have the second corner ready. This will merge them on the same spot. Do not remove the roller (stack will float), but let them slide off by rotating the roller(s).


If you want to stack more items, do not let it slide off the rollers, but continue with next chapter (or start there).
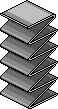
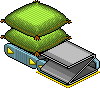
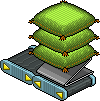
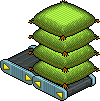
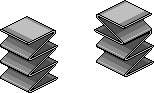
If you need to stack 3 or more items, again put up two rollers facing eachother. Important notes:

- We’re using a z-shelf to stack pillows, they’re roughly same height. If you were to stack red TV’s for a videowall, use a present;
- If not working, you can also make 4 rollers go in a circle - this is more easy;
- You might encounter a limit (like in our test (NL) we were not able to go beyond 4 pillows), depending on hotel version.
Put your item on the z-shelf, and remove the z-shelf.
Now - holding the ALT key - move another pillow to a roller, release it the (milli)second after the floating pillow starts moving towards it. This takes a little practice but is not the hardest part. The pillow will move on top of the other now.
Pick up the z-shelf again, holding the ALT key, place on roller and only release it the (milli)second before the pillows start moving towards it.
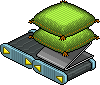
The pillows will move on top of the z-shelf. You’ll notice this part is much harder. There’s a chance you merged the z-shelf with the pillows; take it out and try again. Or use 4 rollers, you’ll find this needs less precision - the pillows won’t move on top of the z-shelf, but will be elevated (you need to take away the z-shelf quickly, though).
Place another pillow, release right after move towards it, again.
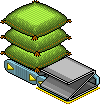
And keep repeating as desired, stacking as much as you want and/or as long as you do not encounter your hotel limits. To conclude, do NOT remove the roller the stack is on (it will be floating in space), but let it roll off by removing/rotating other rollers on the spot you need it.

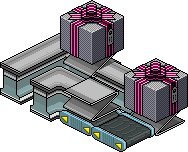
If our interpretation is correct, “Casino stacking” is what’s being referred to as stacking one or more items above a chair, on which you can still sit, as being done in casino’s often. Preferrably, some items are merged above to impress the crowd. There’s a couple of ways noted online to accomplish something like that, but this seems to be the lasting way to do it.

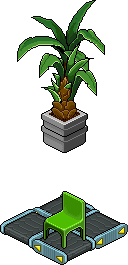
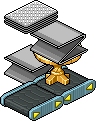
You take 4 rollers, create a circle with them. Then put a z-shelf on them.

Put an item on the z-shelf, we use a pineapple plant. Then take another item (we use a Yukka) - holding the ALT key - and place it on a roller position. Only release it the (milli)second after the z-shelf + pine start moving to that same spot. All 3 items will be merged right there.

Now take out the z-shelf holding the alt key (or take it out, place in room, and pick up holding alt key). Place in on a roller position and only release it a (milli)second before the merged items start moving to that position. You’ll see the merged items being elevated twice, before the items and z-shelf get into regular rotation.

Pick up the z-shelf again, and repeat placing it to elevate the items (probably) twice (may depend on items/chair used). The items will get elevated enough to create room for a chair and a person being able to sit on it.

Time to pick up a chair and move it - holding ALT key - to a roller position. Release it the (milli)second after the plants start moving to that spot to have chair + items being merged.
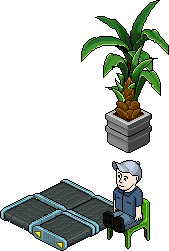
Let whole thing roll off on your desired spot, and, well, sit down I guess ;).
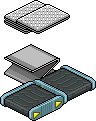
“Close stacking” is merging items with little space between. Ugly, but 1337. You’ll need quite a few items, here’s stacking some doormats:
First, place an area table on top of a z-shelf. On top of that, another z-shelf. Remove the area table and place the first doormat on the shelves.

Now you can remove the top z-shelf, and two rollers next/below the stack. These need to face eachother.
On the rollers, put down a mode corner, and a z-shelf on top of it. Remove the corner, and on top of the z-shelf, put the second doormat. Note you're not required to wait for the exact moment with this method of stacking. Just release it - holding the ALT key, when both items are on the same spot.
Remove the z-shelf, the doormat is now floating and going back and forth on the rollers.
Now here’s the essential part, which will need to be repeated a lot of times. While the item/doormat is moving towards the lower roller, select and rotate the upper roller once; it will now face the stack. The second doormat will move onto the upper roller, and from there slide onto the first doormat.
Basically, we will repeat these steps a couple of times. This round, we’ll put on lodge table and a z-shelf on the rollers.
Remove the lodge table, put another doormat on the z-shelf, and remove the z-shelf. Because we used the lodge table, this doormat will be slightly higher than the other two. Again, rotate the upper roller once, and the doormat will slide onto the other mats.
This needs repetition, every round we’ll need to put different items onto the rollers to get that little bit higher. Just follow this list:
- Mode corner + z-shelf (we did that);
- Lodge table + z-shelf (did that too);
- A present + z-shelf;
- 2 Mode corners;
- Mode corner + lodge table;
- Mode corner + present;
- Present + lodge table;
- 2 Presents.
That’s 9 doormats you don’t want to bang into with your head. Play with items to put onto rollers to adjust spacing.
A known factor while stacking, but we’re not sure how this helps and/or complicates things. We’ve seen rotating items while stacking in a video by BL!NKEY as a way to casino stack, but do believe this behavior is obsolete/patched. Nowadays, a funny thing happens if you rotate items in a stack.
If you rotate any item (in any line of stacked items) besides the top item, it a) rotates but also b) gets moved to the top of the stack. We’ve yet to see if this evolves into a decent method to stack, though we think described methods do the job. Just wanted to note that if you somewhere made a mistake, or are stuck, need to get one more item on top of something, you might consider giving it a try.